From concept to realization Tutorial
Goal: This tutorial will walk you through the steps create a new ‘robosapiensIO’ application and generate skeleton code, ready for implementing your own trustworthy self-adaptive application, based on the RoboSAPIENS Adaptive Platform.
Tutorial level: Intermediate
Time: 20 minutes
Background
To develop on top of the RoboSAPIENS Adaptive Platform, we use standalone application packages that contain everything needed to develop, build, deploy and run the adaptive application. This means that everything needed to go from conceptual design to realization and eventually deployment is contained within the package.
Prerequisites
robosapiensio package: Ensure that the robosapiensio python package is installed in your Python, either system-wide or in Python virtual environment. You can follow the Pypi installation instructions.
[optional] rsio CLI: Ensure that the rsio command-line tool is installed and available on your system.
Tasks
Check if robosapiensio is successfully installed
Open a terminal and run the following command:
python -m rsio version
If the robosapiensio package is successfully installed, it will return the version of the robosapiensio framework, e.g. rsio v0.3.24.
Run the Package Creation Command
Open a terminal in the folder you want to create the new robosapiensIO application package, with name
newPackageand run the following command:python -m rsio package --create -n "newPackage" --verbose
Alternatively, creating the package can also be done using the rsio command-line tool.
rsio-cli package --create -n "newPackage" --verbose
Here’s what each argument in the command does:
package --create: Specifies that a new package should be created.
-n "newPackage": Sets the name of the new package tonewPackage.
--verbose: Enables detailed output during the package creation process.
Verify Package Structure
Navigate to the directory where the
newPackagepackage was created and check its structure to confirm that all necessary files and folders have been set up correctly:cd newPackage ls
Check the newly created robosapiensIO package
You can check that the newly created package is a valid robosapiensIO package, run:
python -m rsio package --check
Alternatively, checking the package can also be done using the rsio command-line tool.
rsio-cli package --check
Here’s what each argument in the command does:
package --check: Check if the current directory is a valid robosapiensIO package.
Developing the adaptive application design
Within the newly generated application package
newPackage, a folder is provided to develop the AADL design, namely /Design. Within this folder, the following design files are required:LogicalArchitecture.aadl: modeling the MAPLE-K components. Instructions how to model components.
messages.aadl: modeling the custom messages. Instructions how to model messages.
PhysicalArchitecture.aadl: modeling the compute architecture. Instructions how to model can be found here !TODO!
system.aadl: modeling the logical-physical mapping architecture. Instructions how to model can be found here !TODO!
Warning
This tutorial focuses on the workflows instead of implementing the self-adaptive application design. Therefore the design file of the
hello worldexample is provided asjson file. Please download the hello world design file (download) and put in the /Design folder.Running the code generators
With the AADL design implemented (
Design/design.jsonavailable), we can trigger de code generation using theAADL2CODEtransformation. Open a terminal in the foldernewPackageand run:cd Workflows python AADL2CODE.py
This will pop-up a window to run the
AADL2CODE transformationas shown below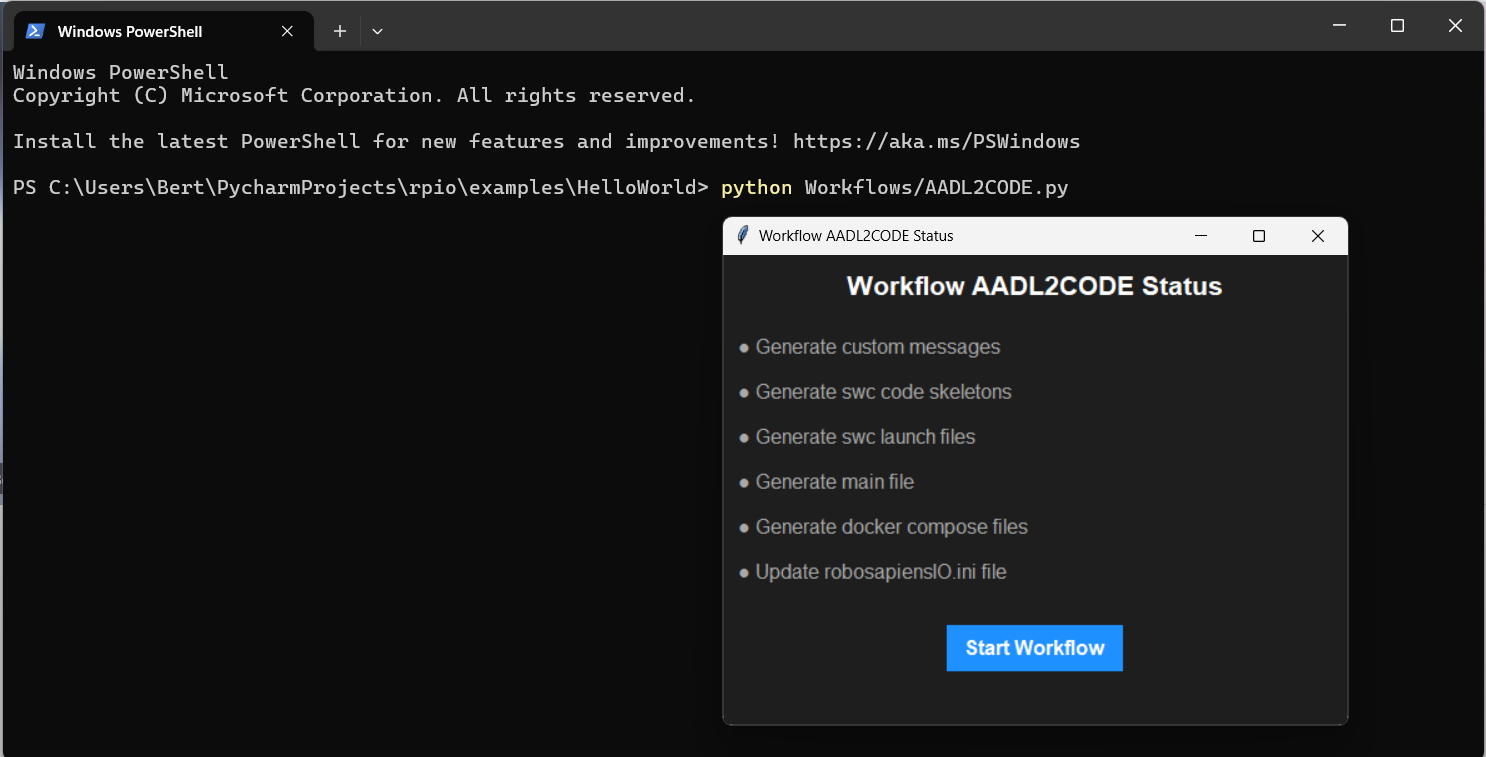
alternatively, the
AADL2CODE transformationcan also be triggered using the rsio command-line tool. Open a terminal in the foldernewPackageand run:rsio-cli transformation --aadl2code
Warning
rsio-cli aadl2code transformations under construction!
This will also pop-up the same window to run the
AADL2CODE transformation.Inspect the generated code skeletons
After executing the
AADL2CODE transformation, the code skeletons for all MAPLE-K components are generated. The code skeletons can be found in folderRealization/ManagingSystem/Nodesas shown below.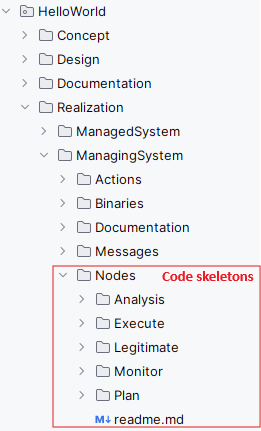
For each MAPLE-K component, a standalone component package is generated, which includes the following elements:
Config.yaml: contains the configuration for the specific MAPLE-K component
Dockerfile: Dockerfile to run the MAPLE-K component as standalone Docker container
messages.py: contains the custom messages, generated from the messages.aadl
component.py: Contains the python implementation of the MAPLE-K component
requirements.txt: contains the python package requirements for running the MAPLE-K component
an example of the generated code skeleton for the
hello worldMonitorcomponent is provided below. It uses the robosapiensio client libraryrpclpyto interface with theRoboSAPIENS Adaptive Platform(e.g. writing to knowledge, listening to and triggering events, etc.) This node is ready to be implemented. Detailed instructions on implementing the MAPLE-K components behavior here.from rsio.client.rpclpy.node import Node import time try: from .messages import * except (ValueError, ImportError): from messages import * #<!-- cc_include START--!> # user includes here #<!-- cc_include END--!> #<!-- cc_code START--!> # user code here #<!-- cc_code END--!> class Monitor(Node): def __init__(self, config='config.yaml',verbose=True): super().__init__(config=config,verbose=verbose) self._name = "Monitor" self.logger.info("Monitor instantiated") #<!-- cc_init START--!> # user includes here #<!-- cc_init END--!> # -----------------------------AUTO-GEN SKELETON FOR monitor_data----------------------------- def monitor_data(self,msg): _LaserScan = LaserScan() #<!-- cc_code_monitor_data START--!> # user code here for monitor_data _LaserScan._ranges= "SET VALUE" # datatype: Array _LaserScan._angle_increment= "SET VALUE" # datatype: Float_64 #<!-- cc_code_monitor_data END--!> _success = self.knowledge.write(cls=_LaserScan) # TODO: Put desired publish event inside user code and uncomment!! #self.publish_event(event_key='new_data') # LINK <outport> new_data def register_callbacks(self): self.register_event_callback(event_key='Scan', callback=self.monitor_data) # LINK <eventTrigger> Scan def main(args=None): node = Monitor(config='config.yaml') node.register_callbacks() node.start() if __name__ == '__main__': main() try: while True: time.sleep(1) except: exit()
Inspect the generated deployment and run methods
After executing the
AADL2CODE transformation, different deployment and run methods are generated for running the MAPLE-K loop. The following deployment and run methods are currently available:Running containerized: the MAPLE-K loop can be run as a multi-container Docker application.
Running manually: the MAPLE-K loop can be run in a manual fashion.
An example of the generated docker compose file for the hello world example can be found in
Realization/ManagingSystem/Platform/xeon1Note
Within the design phase of the
hello worldexample, the complete MAPLE-K and the robosapiensio backend is mapped to be executed on thexeon1compute unit. Therefore, the generated docker compose file contains all MAPLE-K component services and the services for running the robosapiensio backend (EMQX, Redis). Distributed execution of the MAPLE-K can be achieved simply by changing the mapping within the design phase.# Docker Compose file to run an MQTT broker and the MQTT publisher version: '3.10' services: emqx-enterprise: image: emqx/emqx-enterprise:5.0.4 container_name: emqx healthcheck: test: [ "CMD", "emqx", "ping" ] interval: 10s timeout: 10s retries: 12 ports: - 1883:1883 - 18083:18083 volumes: - type: bind source: ./../../../../Resources/acl.conf target: /opt/emqx/etc/acl.conf redis: image: redis:latest container_name: redis restart: always ports: - '6379:6379' healthcheck: test: [ "CMD-SHELL", "redis-cli ping | grep PONG" ] interval: 1s timeout: 3s retries: 5 command: redis-server /usr/local/etc/redis/redis.conf volumes: - ./data:/data - ./../../../../../Resources/redis.conf:/usr/local/etc/redis/redis.conf monitor: build: context: ./../../Nodes/Monitor dockerfile: ./Dockerfile container_name: C_Monitor depends_on: emqx-enterprise: condition: service_healthy environment: - BROKER=emqx analysis: build: context: ./../../Nodes/Analysis dockerfile: ./Dockerfile container_name: C_Analysis depends_on: emqx-enterprise: condition: service_healthy environment: - BROKER=emqx plan: build: context: ./../../Nodes/Plan dockerfile: ./Dockerfile container_name: C_Plan depends_on: emqx-enterprise: condition: service_healthy environment: - BROKER=emqx execute: build: context: ./../../Nodes/Execute dockerfile: ./Dockerfile container_name: C_Execute depends_on: emqx-enterprise: condition: service_healthy environment: - BROKER=emqx networks: emqx-net: name: emqx-net
An example of the generated main file for running the hello world example manually can be found in the
Resourcesfolder (main_xeon1.py)Note
Within the design phase of the
hello worldexample, the complete MAPLE-K and the robosapiensio backend is mapped to be executed on thexeon1compute unit. Therefore, the main file for executing the MAPLE-K manually is generated underResources/main_xeon1.pyTo run the MAPLE-K loop the manual way, the user needs to also manually setup therobosapiensio backend. Detailed instructions how to setup therobosapiensio backendare available on the docker backend page.from newPackage.Realization.ManagingSystem.Nodes.Monitor.Monitor import Monitor from newPackage.Realization.ManagingSystem.Nodes.Analysis.Analysis import Analysis from newPackage.Realization.ManagingSystem.Nodes.Plan.Plan import Plan from newPackage.Realization.ManagingSystem.Nodes.Execute.Execute import Execute import time _Monitor = Monitor("../Realization/ManagingSystem/Nodes/Monitor/config.yaml") _Analysis = Analysis("../Realization/ManagingSystem/Nodes/Analysis/config.yaml") _Plan = Plan("../Realization/ManagingSystem/Nodes/Plan/config.yaml") _Execute = Execute("../Realization/ManagingSystem/Nodes/Execute/config.yaml") _Monitor.register_callbacks() _Analysis.register_callbacks() _Plan.register_callbacks() _Execute.register_callbacks() _Monitor.start() _Analysis.start() _Plan.start() _Execute.start() try: print("Script is running. Press Ctrl+C to stop.") while True: time.sleep(1) # Sleep to avoid busy-waiting except KeyboardInterrupt: _Monitor.shutdown() _Analysis.shutdown() _Plan.shutdown() _Execute.shutdown() print("\nKeyboard interruption detected. Exiting...")
Summary
You have successfully created a new robosapiensIO package using the rsio command-line tool, added an AADL design, based on the hellow world example and generated code skeletons, configurations and deployment methods.
This package is now ready for further development. Please check the hello world example for an implemented example.